
DigitalOcean Managed Databases (MySQL and PostgreSQL) are popular among startups, indie developers, and agile teams for their automated backups, zero-maintenance scaling, and simple dashboard.
To protect customer records, DigitalOcean enforces mandatory TLS/SSL encryption on all public connections. If you attempt to connect without specifying the cluster’s CA Certificate, your connection will be rejected with SSL handshake failures:
SSL connection error: self-signed certificate in certificate chain
-- or:
FATAL: no pg_hba.conf entry for host, SSL off
In this tutorial, we show you how to download your DigitalOcean CA certificate and configure a secure, encrypted connection in SQLOZ on macOS.
1. Downloading Your DigitalOcean CA Certificate
- Log in to your DigitalOcean Cloud Control Panel.
- Navigate to Databases and select your cluster (e.g.,
db-mysql-lon1ordb-postgresql-nyc3). - In the Overview tab, locate the Connection Details box.
- Click Download CA certificate to save the
ca-certificate.crtfile to your Mac (e.g., in~/Downloadsor~/.ssh/).
2. Setting Up the Connection in SQLOZ
SQLOZ provides native support for TLS 1.3 and custom CA certificate verification without requiring command-line conversions.
Step 1: Enter Your Connection Parameters
- Open SQLOZ and click New Connection.
- Choose MySQL or PostgreSQL.
- In DigitalOcean, toggle connection mode to Public Network. Copy and paste:
- Host:
db-mysql-...ondigitalocean.com - Port: DigitalOcean uses custom non-standard ports (e.g.,
25060). - User & Password:
doadminand your generated cluster password. - Database:
defaultdb.
- Host:
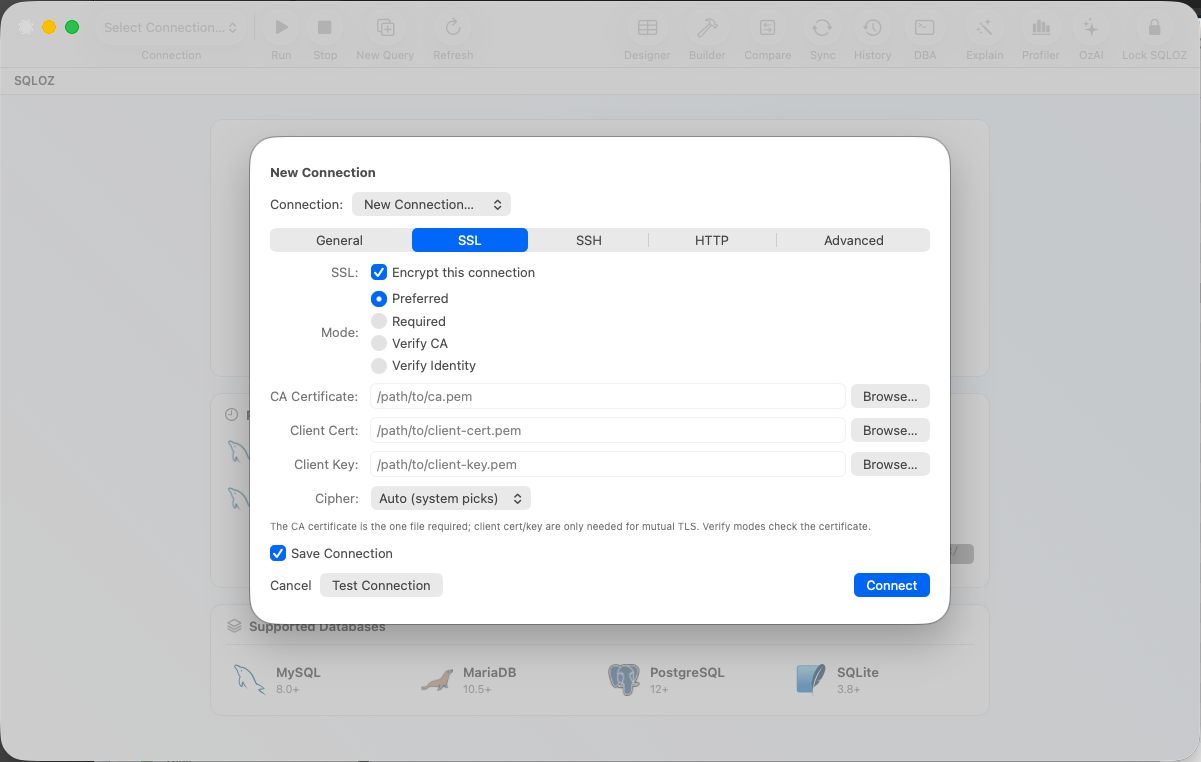
Step 2: Configure the SSL / TLS Tab
- Click on the SSL tab in SQLOZ.
- Set SSL Mode: to Verify CA (or Require).
- CA Certificate File: Click the file selector and choose the downloaded
ca-certificate.crtfile from DigitalOcean. - Toggle Validate Certificate Chain ON.
Step 3: Test and Connect
Click Test Connection. SQLOZ verifies the server certificate against DigitalOcean’s Certificate Authority, establishes a hardware-accelerated TLS 1.3 socket, and mounts your database in under 200 milliseconds.
3. Trusted Sources: Locking Down Access
For maximum security, once you have connected SQLOZ:
- Navigate to your DigitalOcean Database Settings ➔ Trusted Sources.
- Restrict inbound traffic exclusively to your Mac’s current public IP address (or your office VPN).
- DigitalOcean will immediately block all other IPs on the planet, eliminating automated brute-force attacks.
Summary
Connecting to cloud-managed databases on DigitalOcean is fast and secure when your database client handles SSL certificate chains properly.
Download SQLOZ for macOS and connect to DigitalOcean, AWS, and Supabase databases with native TLS 1.3 encryption.